Budget Mobile Ham Radio Install in Chevy Colorado.

My first thought was: Antenna clipped to the edge of the truck bed – easy right! How am I going to get the antenna wire poked into the bed of the truck? There is nothing back there, no holes, no grommets. For a commercial vehicle this makes sense for the eventual tool-cab or dump body – pop off the bed – no wires to deal with. I followed the existing wire loom and it travels along the frame, under the cab, and up through the firewall. So, if I wanted an antenna mounted to the lip of the bed, I was going to need a 30′ coax detour. Not to mention exposing that wire to the elements and spending 3 hours on my back with zip ties.

Plus, I have a tonneau cover. The edge of the bed isn’t exposed, and I’m not drilling a brand new hole in it. Time to re-think this whole operation.

Fender mount! Why stretch wires all over the cab when I can grab power and antenna from the same area? I did a search for these online and the premise is a metal bracket that attaches to one of the fender (or hood latch) bolts on the front of the truck. There are many available, but not for every truck, and they are not usually inexpensive. I was considering ordering one that looked like I could modify it to fit, but for $66 + shipping, that’s an expensive experiment. Instead I made my own! If you own a vise, a hammer, and a drill – you can build this.

For $8, I grabbed a flat bar of 1/16″ (or 3/32″) 2″ wide steel from the local hardware depot. Hood up, cardboard template gave me an upside-down “2” shape. I marked up the steel and into the vice it went. Hammer, hammer, hammer, fold, check fit, hammer, check fit, repeat! Making sure that the hood had clearance and that the mount would press snugly against the fender. I was able to cut a slot for the hood bolt using a grinder. A dremel could do it, or a hand drill would work here. I sanded the edges and coated with Rustoleum Flat Black Trim Paint. For the Antenna itself I now had a platform for an off the shelf trunk lip mount. I chose a Tram 3246-B SO-239 mount as I re-used the antenna from my old truck (a Diamond NR770HB). It’s close to a factory look, as this is where the FM antenna would go on older trucks. Also I chose the drivers side specifically because the ECU (PCM / Computer) is bolted to the firewall on the passenger side. I want to minimize electromagnetic interference from this, and 65 watts of EMR (electromagnetic radiation) getting into this.

The grommet through the firewall is over-sized enough that I was able to squeeze the UHF connector through intact. The Power distribution bus on these new Chevy trucks are fantastic and I had fused ground and positive wires going right to the battery using ring terminals and existing bolts. Now power and antenna were in the cab. Where do I put the radio?

In the 2014+ Colorado, there is a nice storage shelf under the rear seats in the crew cab. If I was running multiple radios, or additional equipment, I think I would take the time to route everything back here. This would of course necessitate removal of the center console to route the wiring under the carpet. In our old Blazer I didn’t take the time to do this and occasionally dragged things over the “neatly zip-tied, but totally in the way” wires running along the floor. The center console is like a sealed piece of Tupperware that’s not quite square inside, and gouging giant holes in the bottom for wires and radios would render the storage area useless. I instead turned my attention to the front seat.

My Kenwood TM-V71A roughly fit in the area, but I was worried about the seat mechanism hitting it. I picked an area of the floor that I felt would be clear, and then moved the seat into “wife is driving” mode. The radio would be crushed by one of the seat motors. “Well, maybe the radio moves with the seat?” I situated the rig against the round bar in the middle of the seat and tried various positions – it seemed to work! I then went back to the vice and fabricated an aluminum bar with tabs to bolt onto one side of the rig. Using pipe clamps I got it into position and tried moving the seat. It actually pivots a LOT more than I expected, but I was able to find the angle where: At full depth it’s tucked up into the seat, at full height it’s lightly touching the floor. I then moved the seat all the way forward and all the way back to make sure I had clearance. It worked out great! Here’s VIDEO of the seat and radio going from all the way up – to all the way down.

A nice doughnut of spare coax was made à la choke coil and everything was zip-tied up and checked again for clearance. The remote head and speaker wires were run up the side of the center console. The mic connection on this mobile rig is now in a great spot, and because the radio travels with the seat there is always enough cord!


  • Generic parts:
    • $8 Flat bar of steel
    • $4 Aluminum bar (scrap)
    • $30 Trunk Mount (Tram 3246)
    • $42 Subtotal
  • Radio Specific Items:
    • $50 Diamond NR770HB (I owned from previous install)
    • $40 Kenwood DFK-3D Remote Mount Kit (previous install)
    • $90 Subtotal
  • $130 Total

Easier, Better, Arduino IMU Head Tracker

mainI’ve recently been immersed in a space sim called Elite:Dangerous. (It’s in Gamma and will be out shortly 12/16/2014.) I play with a small casual group that’s not about to build a ship cockpit in our living rooms or all splurge for a dev kit VR Oculus Rift. Some of us have played Elite on the Oculus and the first thing you miss is “head look”. The game is designed for it, and once you use it dog-fighting in an asteroid field, watching your enemy turn sharp high above you while you cut power and rotate at the same time whilst avoiding giant floating rocks, you don’t want to give it up. This is one of those games (much like a flight simulator) that takes 30 minutes just to map your controller(s).

My brother linked me to a UK group that was doing head tracking with an Arduino (SparkFun Pro Micro) and a Gyroscope / Accelerometer (MPU-6050) over at edtracker.org.uk, “Can you build this?” he asked.

“I can build a better one.” and you can too.

  • No drift – Use hardware that incorporates a magnetometer (compass)
    (The new edtracker 9150 version uses a magnetometer to remove drift)
  • No calibration GUI – Place flat on table when powering on
  • No PCB – Four connections. SCL, SDA, +5, GND

Here’s what makes up the easier better IMU head tracker:

The first thing I noticed was the drift problem. The EDTracker guys have since put out a second version with magnetometer compensation, but they didn’t have it from the start and the hardware difference is around $6. I picked an IMU hardware package that has a great tested library for it. The calibration and angle calculation built into the Pololu libraries – specifically the code from Michael Baker Pololu_Open_IMU (Inertial Measurement Unit) as it uses the Madgwick algorithm is particularly brilliant. It outputs pitch, yaw, and roll angles. Watch a video of the Madgwick algorithm in action.

joy_cpl
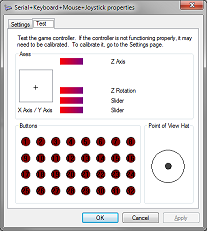
I knew from past experience that the Teensy 2.0 can emulate many types of USB devices right out of the bag. “
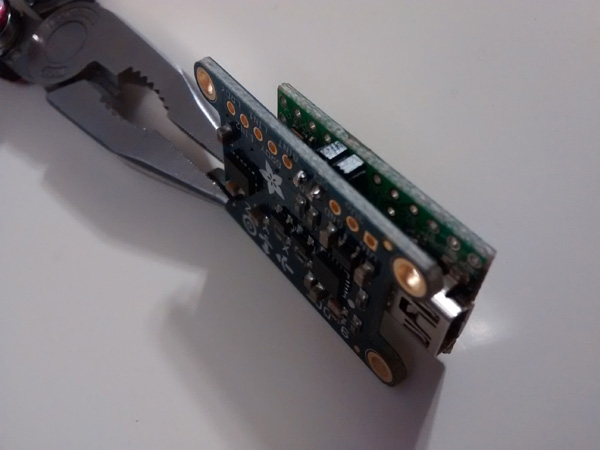
Joystick.X(value);” was simple to integrate and the device needs no emulation software or additional CPU to work. It just shows up in joy.cpl as a Joystick. You wouldn’t think that an Arduino could handle complex Euler angles and lots of float math on its own, but it has no problem. With the Teensy Joystick, the X,Y, and Z can be directly mapped 0 – 1023.

Lastly there are PCB boards being built for this, and  I’m really not sure why. These are not PCB’s with components on them like an ATMEGA32U4’s and the 9 Degree of Freedom hardware already built in. These are PCB’s just to connect a 9-DOF board with an Arduino. This is all of 4 connections, and the two pins on the Teensy 2.0 are D0 (SCL) & D1 (SDA) and they line up fine on both the Adafruit and Pololu breakouts for an above mount setup.

2pins_2wires
Yes, I cover the Teensy reset button. The PJRS software has a great auto-loader and you just don’t need it. You also don’t need a fancy PCB – two pins will do.

With the hardware finalized, I mounted it in a small box with a dab of hot glue and a cut-out for  the mini-usb. Here’s the test:

For the head tracking code I used Fscale to scale map the angles to the joystick. This is the part where you amplify a tiny amount of head movement into a larger amount of in-game head-look movement.  I settled on a 50° angle for pitch and roll, and an 80° angle for left and right (yaw). You’re more than welcome to try a different scale by changing the low and high Fscale numbers (-25 & 25 = 50° of movement translates into -90° & 90° of game movement) Everything else is directly from Michael Baker mikeshub/Pololu_Open_IMU. Such a tiny amount of code here is from me that I don’t even want credit for it. 😛 I’m just a lowly hardware guy that can smash out some C#. Example:

if (pitch < 0){pitch = fscale(-25, 0, 0, 512, pitch,0);} else {pitch = fscale(0, 25, 512, 1023, pitch,0);}
Joystick.Y(pitch);

Here’s a list of what you will need for software:

The device calibrates when it it powered on, make sure it’s flat and motionless. After that it takes an initial heading reading and starts to blink. 20 more seconds of being on, and that heading is locked in. I commented out all of the serial outputs and zip tied it to my headset:


Results: After playing for 3 hours I had zero drift. It stays pointed at the direction of your monitor forever. I considered adding a curve to the scaling to provide a “dead zone”, but the game has a dead zone setting built-in and I’d rather just output 100% and let the game / user control the settings. I also mapped the roll axis and one could use it to fire the roll thrusters in the game. For ~$45 you now have a cool little IMU that you can experiment with!

finished

Update: If you would like to configure it to work with Opentrack (supports TrackIR games), you will need to map the axis 1:1 with the joystick output and then set all your curves and config up in Opentrack.

fscale(-90, 0, 0, 512, your_axis,0)
fscale(0, 90, 512, 1023, your_axis,0)

Update 1/16/2016: Uploaded code and working with Grégory Paul over on hackaday.io
https://hackaday.io/project/8952-elite-dangerous-headtracker

My ix2 is EOL and doesn’t finish strong – or secure…

Disappointing finish for my Iomega StorCenter ix2. The second drive failed and it has been replaced with a Synology DiskStation DS212j with WD Red drives. (more on that later) I was doing some consolidation and cleaning of the computer room yesterday and I decided it was time to wipe some hard drives including the ix2 NAS.

The replacement WD Green and the old original 500GB Seagate spin up and after a few minutes I can login via the web interface. I go into the manage disk section and I’m excited to see there is an Erase Disks section under Manage Disks. The first message tells you that you’ll need to delete all the shares (including the built in ones?!) before using the wipe functionality. The second message talks about how securely erased your drives will be. For those of you who don’t know me – here is the setup..

iomega unsecure disk wipeSecure Erase:
All data is permanently erased and overwritten to prevent recovery, user information is removed, and the device is reset to factory defaults. Disk erase is a secure operation to ensure all data on your Iomega StorCenter device is irrecoverably deleted. The disk erase process overwrites all disks with random data to prevent recovery of existing or deleted data, users, and passwords.

…and the outcome? Well I clicked it, confirmed it, and watched as the red light came on and the drives started to chug. Just like when it gets stuck doing a rebuild, I wanted to see what it was up to. I was also curious if this would affect my ability to SSH into the machine. Not only could I still log in to the ix2, I found the program that it was running to wipe the drive:

/usr/bin/shred -v -n 1 /dev/sda2
/usr/bin/shred -v -n 1 /dev/sdb2

I looked quickly at the man page for shred. The default setting is 25 times. Older versions list the default at 3. Iomega changed it to make a single 1 time pass! 🙁

Think you might donate or craigslist your old NAS drive? Well if it’s an Iomega – don’t rely on the built in “Secure Erase” to protect your data! A single pass (while at least random data) is going to be slightly better then a “quick format”. When it finished and re-initialized I restarted it, and I STILL had root access. (read: factory defaults) To which I ran my own shred on both /dev/sda2 and /dev/sdb2.
Ciao ix2!

iomega_shred

Friendship Economics

The friend penny jarHere’s a little something that I’d like to share with the world. It will make you a better friend and you’ll stop wasting your time on people that don’t value your friendship. I call it “The Friend Jar.” This idea has evolved over my years and I wish I employed it back when I was in High School.

The idea is: You view every friendship – male, female, romantic, platonic, employee, boss, couple, etc. as a jar of pennies. So you meet someone and the jar is created *poof. You make a gesture of friendship and your money goes into the jar. They make a return gesture and their money goes in. Now you don’t have to assign some actual number – just that some intrinsic value has been invested in the friendship. If they don’t take you up on your offer you lose your change (as in: the amount of time you have invested in the friendship is gone forever). Time is money after all. The jar can only grow when both friends are contributing. Some friendships, like future spouses, take gobs of effort and lots of change. Some friendships, like neighbors, only take a few pennies now and then and grow stronger over time.

You are invited for an event and you go and have a great time – their money in the jar, you reciprocate. You invite them to an event and they show up and have a great time – your money in the jar, they reciprocate. You probably already know when a friendship isn’t working or is one sided, but this will help you spot it a lot sooner. I usually give the jar 3 turns before I stop putting money in.

For example: You call up your friends and mention going out. They are too busy and can’t set a date. That’s okay, it happens. You run into them and suggest a movie night or other activity and they don’t show or forget and don’t call. People forget stuff. Now you are on your third round of putting some change in the jar without a return on investment. The jar is empty and you are about to lose more change. At this point you may want to make a big final effort. “What day should we go to that pastry shop that you love? Any day this week would be great!” Something that I know (from being friends) that they and I enjoy – that we could enjoy (as friends) together. :D

So, you go to the pastry shop, or play laser tag, or meet up in a brothel – whatever… :p You have a great time and as friends always say. “We should do that again!” Now is their turn. You are out of cash, my friend, and you’re not going to call them or email them until they call you. Nor should you try to arrange another meeting, get-together, gathering, etc. The ball is in their court. Time to ante up.

I will tell you that I can actually remember some of the final efforts I have made. Clearly my friendship was not that important – otherwise I would have got something in return. As I’ve only invested a small amount into the friendship, I’m not pissed when they never call and I run into them. Until they make some effort, they are wasting my time. When a friend does reciprocate, it’s even more special. That – “Hey we haven’t talked in a while. Why don’t we get together?” phone call or email is sweet and something I like to call “Money in the jar.” This concept works great with ‘couple friends’ and has weeded out and built some great friendships in the time we’ve been in California.